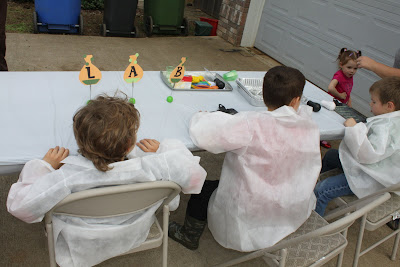
Something that was really important was to have everything prepped in advance. I know from experience how crazy it gets during the party, and I didn't want to have to be rushing around trying to find food coloring or containers. And, since I had a couple 'assistants' (my best friend and mom, as usual, saving the day for me!) I wanted to make sure they knew what to do if I had to run off somewhere else.
The kiddos were all ready to start experimenting (that's my long haired hippie kiddos on the left, hehe)!

Something else I did, was in addition to buying the actual experiment supplies, was to buy small cake pans (Dollar Tree has them in a two pack for $1) that the kids could perform their experiments in. Although we were outside for most of the experiments, and the table was covered in plastic, I thought it would help to contain all the kids' experiments. I also bought some cookie sheets (from the dollar store) that resembled medical trays (at least I thought so, haha) to hold all the pieces of the experiments, so that I could have them all set up and ready to go. And containers for each child to use for their slime experiment so they could then could take their slime home in it.
These little things went a long way in keeping everything running smoothly!
So, in order these are the experiments we did at the party.
Grow Your Own Snow
Supplies:
- Kit-sold at Michaels (we used three kits for about six kids)
- Containers to hold the snow-We used plastic Dixie cups
- Water-We used turkey basters (bought at Dollar Tree) so the kids could easily add their own water.
- *Optional-food coloring


Volcanoes
Supplies:
- Modeling clay or playdough (word to the wise here: I tested with playdough & it worked great but when I went to pick up supplies I saw the modeling clay was really cheap. Since several sites used this, I bought it instead. It turned out it was really hard for the kids to mold, so unless you have older kids, I would stick with the playdough)
- Spoons to add baking soda (I used my daughter's old baby spoons-those little plastic type)
- Vinegar
- Baking soda
- *Optional-Food coloring (though if they can the kids will want to add it to everything)
- Have the kids make form their playdough/clay into volcano forms (you may find it easier to have them mold it around a cup). It doesn't have to be perfect; just have a hole in the middle to put in the solution.
- Add a couple spoonfuls of baking soda to each volcano (best if parents do this part to avoid adding too much)
- Have the kids add the vinegar (again we used turkey basters here) and watch the explosion!
- This is really a fun experiment that's easy to do (and doesn't cost a lot in supplies) for the kids! The best part is that they can keep adding the vinegar over and over to keep making their volcanoes erupt (and that's the perfect time for you to get set up for the next experiment). :)
Supplies:
- Mixing bowls
- Warm water
- Elmer's glue
- Food coloring
- Craft stick
- Borax
**This one I handled I little different, since there were several components involved. There are two different solutions that need to be mixed together here, so I pre-measured them and let the kids add them.
In one container (these were the plastic bowls I had for each child and I also wrote each name on with permanent marker) add:
- 1/3 cup warm water, 1/2 cup Elmer's glue
- Then let the kids add:
- Six drops food coloring of choice and stir with craft stick
- 3/4 cup warm water and 2 teaspoons Borax.
- Then have the kids just shake, shake, shake to mix up the ingredients!
Now:
- Have the kids pour the second mixture (in the cup) into the first (in the bowl) and stir. They might start stirring using the craft stick, but will eventually have to use their hands when it thickens up. Make sure they incorporate everything together as well as possible and really knead it together. There will be some leftover water which is completely normal.
The kiddos are all enjoying their new slime!

Pudding Creations
Supplies:
- Pudding (or you could even do ice cream, yogurt, etc)
- Mix-ins (I had sprinkles, gummy worms, crushed cookies & candies in various test tubes and petri dishes)
Again pretty self-explanatory..just let the kids add whatever they want! :)
My birthday boy enjoying his pudding!

Mentos/Diet Coke Geysers
The kids were lined up waiting for their turn!

Supplies:
- 1 or 2 liters Diet Coke
- Mentos candies (about four per bottle)
- Put the soda bottles on as flat a surface as possible
- Give each child their Mentos
- Add the Mentos and get out of the way!
My son was the first to go and really got it started off right!

My hubby also discovered using a toilet paper roll placed over the opening to the bottle gives the kiddos with smaller hands easier aim to add the candy. Just be aware you'll only get a couple uses out of each roll, as they get wet quickly (you can also but Mentos launchers from Micheal's, as well as several online stores)!
What is funny to me here is the reactions of all the kids in the background!

And, that's it! The kids all had a fantastic time and got to take home some of their wonderful creations (the snow, slime and the pudding creations were consumed about two minutes after they each made them, haha).


Thank you for the great ideas!
ReplyDelete