Showing posts with label Valentine's Day. Show all posts

Monday, February 14, 2011

Valentine's Day Countdown: Homemade marshmallows


Even though hubby and I don't usually do much for each other on Valentine's Day, I just knew I had to make these marshmallows. Okay, well actually, the truth is that I had planned on making them for him for Christmas a year ago (so two Christmases ago) then again last Christmas, but it just didn't happen.

But, it seemed like it would make a good Valentine's gift...

Now, my hubby is a marshmallow fiend. I don't think anyone in the world loves marshmallows as much as him. And, I didn't even really think people even liked marshmallows before I met him. I mean, you use them for s'mores, maybe hot chocolate and that's it, right? But, nope, he can polish off an entire bag of Jetpuffs in one sitting.

So, I enlisted the help of my trusty assistants and got to work...

Homemade Marshmallows

Ingredients:

3 packets unflavored gelatin
1 C ice water, divided
1 1/2 C sugar
1 C light corn syrup
1/4 teaspoon kosher salt
1 teaspoon vanilla extract

1/4 C corn starch
1/4 C powdered sugar

Optional:
-- Add all flavorings and colorings in the last few minutes of beating.
For Cocoa Marshmallows: add in 3-4 tablespoons of unsweetened cocoa powder. If you make cocoa marshmallows, add a spoonful or two of cocoa powder to your cornstarch mixture as well.
For Peppermint Marshmallows: add in 1/2 teaspoon peppermint extract
For Colored Marshmallows: add food coloring in the last few minutes of beating (think colored fruit flavored marshmallows!)

9 x 13" pan
non stick spray


Directions:
Place the contents of the gelatin packets into the bowl of a stand mixer.
Add 1/2 C of the ice water.


Stir gently to combine and then set that bowl aside.

In a small saucepan combine: remaining 1/2 C water, corn syrup, granulated sugar, and salt. Stir mixture to combine and bring it to a boil. Reduce to a simmer and then clip a candy thermometer onto the pan.
The sugar mixture needs to remain on a simmer and come to a temperature of 245 degrees F.
This was taking a long time for me, so I increased the temperature to more of a slow boil, which got it there much faster. Just keep a close eye on it and the temp and stir occasionally.


While you're waiting for your mixture to reach the correct temp, you'll have some time to, say, put on a fun photo shoot with your pint-sized sous chef.


After the mixture reaches 245 degrees, remove from heat.
While your mixer runs on low speed, you need to slowly pour the sugar mixture into the bowl with the gelatin.
You may want to put the mixture into something with a pour spout, to make it easier to get in your mixer.


After you add the entire sugar mixture to the gelatin turn the beater speed up to med-high. Continue to whip for 12-15 minutes, adding the vanilla in the last few minutes of beating.
*If you plan to add flavoring/color, remember to do it in the last few minutes of beating.


Take this time to prepare your pan.

Combine the cornstarch and powdered sugar in a small bowl. Spray a 9 x 13" pan with non stick spray and coat the bottom and sides with the cornstarch mixture. Tap excess out and save it.

When your marshmallows are done beating the mixture should be thick and white, kind of like jarred marshmallow cream.

Using a spatula, coated in non-stick spray, scrape bowl into your prepared pan. You may have to spread it around a little, which is why you want your spatula sprayed, to make it even.


Let the pan sit at room temp for about an hour (to form a dry layer on the top) and sprinkle a couple spoonfuls of the corn starch mixture over the top. Cover with a sheet of plastic wrap and let it sit overnight.

When they're ready to cut, just pull the marshmallow sheet out of the pan.

Now, it's time to cut (this is a great project for the kiddos!)!
You can use cookie cutters to make fun shapes (we did hearts!) or just use your pizza cutter to cut into bite size squares. Make sure to coat your cutting implement frequently with the cornstarch mixture, because this stuff gets pretty sticky!


And, now for the fun part! You can, of course just start digging in or even prepare a nice mug of hot chocolate to plop them in. If you're giving them for gift you can prepare your packaging. We simply put ours in a cellophane bag tied with a handmade note for the hubby. You could really have fun with it, even coating them in chocolate...or how about putting them with a graham cracker and dipping the whole thing in chocolate! Yumm!

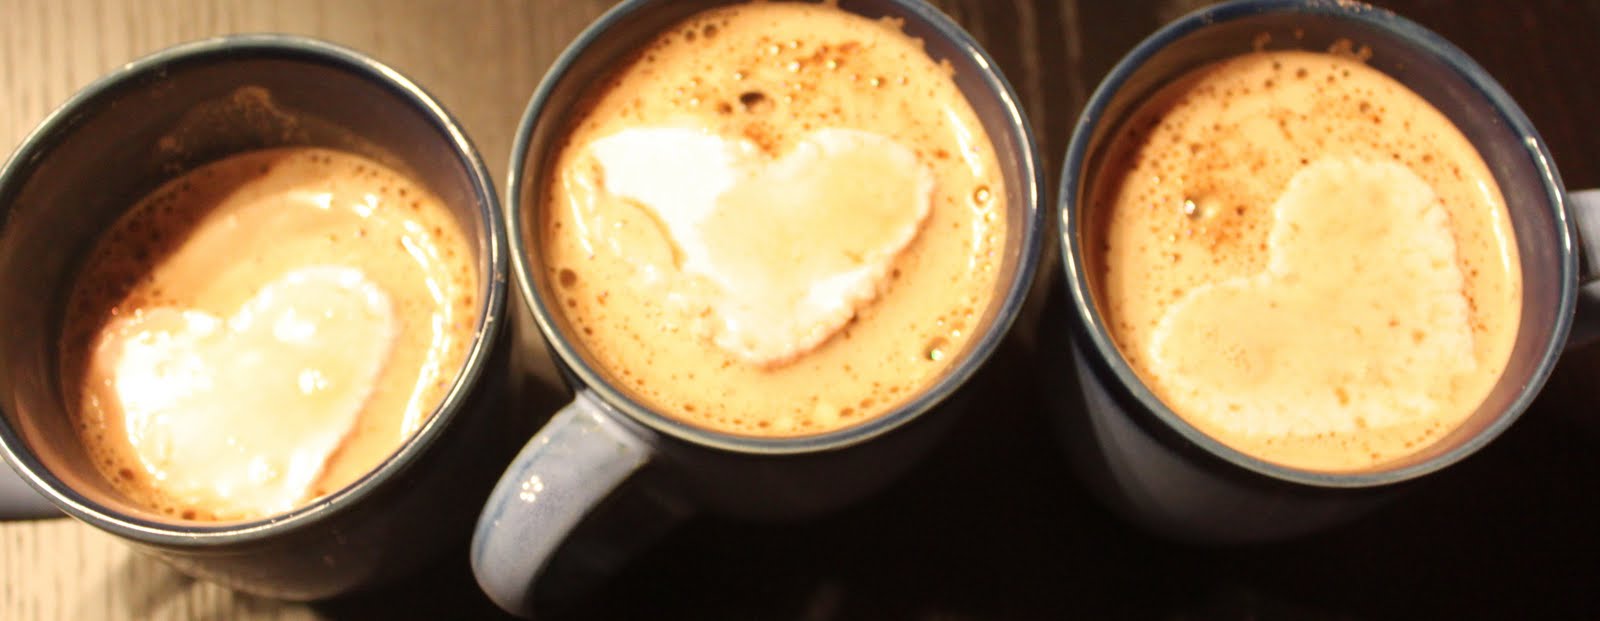
We presented them to my hubby tonight and he loved them! I had saved a few out, and we used those to put in hot chocolate (we added peppermint to ours, so they added a nice extra touch to the hot chocolate) and they were delicious!


So, I know Valentine's Day is officially over, but that shouldn't stop you from making this for the next holiday, birthday or just random Thursday (trust me, that are that good!)

And, if you do make some, link back to me, so we can see what you came up with! :)

Linking up here:
all crafts Handmade Projects & Parties ~ Add Yours! handmade projects

Photobucket
NightOwlCrafting

Tuesday, February 8, 2011

Valentine's Day Countdown: Homemade Pop-Tarts


While I'm not too big on Valentine's Day, my kids love it. To be honest, they love any semblance of a holiday, because around here that usually means crafts, cookies, decorations, etc to go along with said holiday. And, of course, Valentine's Day is no different. So, I've given in, jumped on the bandwagon and, well, here I am...

I thought I'd share some of the Valentine's fun we've been working on, and will post a Valentine's related craft, recipe every day until the big day. :o) So, here's my first one...

I first saw a recipe for homemade Pop Tarts a few months ago. Homemade Pop Tarts?? Umm...yes, please! Like everyone else on the planet, I love Pop Tarts (c'mon, admit it...you know you do too)! In fact, during my days in the college dorms, I lived on Pop Tarts, Ramen noodles and Dr Pepper and when Colin and I were poor college students living on our own, Pop Tarts were a staple in our apartment. There was a short period of time we had them in the house for Colin (who still loves them and gets away with eating them since he cycles 10 miles to and from work each day), but once Z started asking for them, I had to ban them from the house.

Once I saw I could make my own, much healthier versions, I jumped on the chance!

And, I thought what a perfect Valentine's breakfast they would make, cut out into heart shapes.

Homemade Pop-Tarts
Source: Macaroni and Cheesecake, King Arthur Flour
Yield: 9 pop-tarts or about 6 heart-shaped pop-tarts (I used a medium sized cookie cutter)

For the pastry crust:

2 cups all-purpose flour
1 tablespoon granulated sugar
1 teaspoon salt
1 cup (2 sticks, or 8 ounces) unsalted butter, cold and cubed
1 egg
2 tablespoons milk
*I cheated and bought the Pillsbury pie dough from he grocery store. It seems like this might yield a smaller batch of pop-tarts than the homemade pastry dough, so just keep that in mind.

Filling Options:
Strawberry jam
Chocolate Chips
Nutella
Cinnamon/brown sugar

For the Strawberry jam filling:
¾ cup strawberry jam
*Here's where you can make it much healthier! Use your favorite sugar-free jam or your own homemade (sugar-free) jam like I did!
1 tablespoon cornstarch
1 tablespoon water


For the Cinnamon Filling
1/2 cup brown sugar
1 to 1 1/2 teaspoons ground cinnamon, to taste
4 teaspoons unbleached All-Purpose Flour
1 large egg, to brush on pastry before filling

Optional Glaze
½ Cup powdered sugar
1Tbl butter
1-2 tsp milk (less if using cream)
*You can add 1tsp unsweetened cocoa powder to glaze the chocolate pop-tarts or 1tsp cinnamon for cinnamon/sugar pop-tarts.


For Assembly:
1 egg, lightly beaten (to brush on pastry)
powdered sugar or flour for rolling out dough

Directions:


Strawberry Filling:
In a small bowl, whisk together the cornstarch & water. In a small saucepan, add strawberry jam & the cornstarch mixture. Bring to a boil & then simmer for 2 minutes, stirring constantly. Remove from heat & allow to cool.

Cinnamon Filling:
Whisk together the sugar, cinnamon, and flour.

Glaze:
Heat in small saucepan and whisk until smooth (or heat for about 1 min in microwave).

For the Crust:

In a large bowl, whisk together flour, salt & sugar. Using a pastry cutter, cut the butter into the dough until the mixture resembles coarse meal & the butter is the size of peas. In a small bowl, whisk together the egg & milk. Add the egg mixture to the flour mixture & mix together with a fork until dough is evenly moistened. Knead briefly until dough comes together.

To Assemble:
Cut the dough in half. (To make the dough ahead, you can wrap each section of dough & refrigerate for up to 2 days, allowing dough to come to room temp. before rolling). Sprinkle powdered sugar on your rolling surface & then roll out one piece of dough to 1/8 inch thick, into roughly a 9 1/2 x 12 1/2 rectangle (my dough rolled out to a little less than this and it yielded the same amount of tarts). Trim the edges to get straight lines all around. Cut the dough into either 9 evenly sized rectangles or into shapes with cookie cutters. Using a straight spatula, transfer dough rectangles to a baking sheet lined with parchment. Brush the beaten egg lightly onto each of the pop-tarts.
Spoon a small amount of strawberry or brown sugar/cinnamon filling onto each (1 tsp to 1 tbsp. depending on your size). If adding chocolate chips, use about 1 tsp added to middle of pastry.
*Be sure to leave a 1/2 inch of space around the edges and do NOT overfill these as they will be messy!


Roll out the remaining piece of dough as you did the first, cutting into the same amount of pieces. Top each prepared piece of dough with another. If you are cutting out shapes, you will have leftover dough. Just keep rolling these out, so you can cut out more shapes (I ended up with a couple smaller hearts, just so that the dough wasn't wasted).
Press the seams of the dough with your fingers to seal. Press a fork around the edges of each rectangle, then prick the tops so that air can escape. Very lightly brush the tops with beaten egg.


Place the pan of tarts in the refrigerator uncovered for 30 minutes. Meanwhile, preheat oven to 350 degrees. Bake for 25 to 30 minutes, until lightly golden brown. Cool slightly.
Brush or drizzle glaze on and add sprinkles, colored sugar, etc.
These are best served warm, so if you make them ahead of time reheat them in a 200 degree oven for approximately 5 minutes until warm. Store in an airtight container for up to one week.


Linking up here:
Photobucket


Join us Saturdays at tatertotsandjello.com for the weekend wrap up party!
Related Posts with Thumbnails

Guestbook

 
Pin It button on image hover