Friday, July 22, 2011

Graduation Party!!


Every year, we usually have to add in at least one wedding or graduation to our busy Summer schedule. With all of my family living in the general area, it always seems like there's one cousin or another graduating, which usually means a party to attend.

Well, this year it happened to be my little sister (and, yes, in case you were wondering there is 15 years difference between us)!


Being the party planning nut that I am, I of course offered to throw her a big graduation party. We also decided since she turned 18 just a few days after graduating, that we'd celebrate that too!

This was definitely one of my favorite parties to throw! I know I say that after every party (haha), but I really enjoyed putting everything together and really staying within my budget here. Also, it wasn't like my usual kids parties or showers where there would be a big theme to tie it all together. I was really just relying on the graduation aspect of it to make everything work.

Thanks to Pinterest I found some really great ideas and combined with some of my own (hey, I do have a few moments of genius myself from time-to-time!) came up with a great plan!

Besides being on a pretty strict budget, I also wanted to try to keep things low-key (hence the lack of theme) because my sister is a pretty low-fuss kind of gal. The one thing I wanted to try incorporating, at least minimally, was an artistic aspect to the party. Mercedes has always been very much into art, loves sketching and drawing, and is even thinking about attending The Art Institute.

So, one of the first things that popped into my mind was a way to use that in a fun way.
I decided instead of a guest book or the now-usual picture with mat frame for guests to sign, I would have them get in touch with their inner artist!


Something I tried doing, since I was on a tight budget, was to use things I already had.

I put together this little sign and added it to a frame ($.99 at IKEA!) I had had for a previous party. I and added some blank notecards my mom had laying around and raided my party favor stash for crayons. I set everything on the gift table for the guests to use, and it turned out perfect! The guests really got into writing, making up limericks and drawing and Mercedes loved all the finished 'pieces.'


I decided to take the art idea one step further, and also decided to add butcher paper to all of the tables for guests to doodle on. I placed little buckets (these were also left over from another party) of crayons out the tables as well. The guests really seemed to enjoy drawing on the tables and Mercedes even took home some of the art after the party.

When I saw the vellum insert that went into her graduation announcements, I knew I had to find a way to use it! I love vellum, and this was basically a free decoration (and free is always welcome!)!
I had a couple green (the school colors were blue and green) picture frames I borrowed from my daughter's room, added that to one and a picture of my sister on graduation day in the other. Then I just scattered other pictures around. It looked great and really tied everything together!


Oh, and the 'M?' I bought it at Michaels for $1 and had planned on modgepodging it to match everything better. Then I forgot about it and found it at about midnight before the party! So, I broke out my trusty double-sided tape and voila!

I also knew I wanted to display a lot of photos of Mercedes through the years and wanted to display them in a unique way. I toyed around with several ideas, but the one that kept coming back to me was the idea of stringing them up somehow. To me, that seemed like a carefree kind of way to show them off, which was what my goal was for the day. :o)


I had seen some different pictures of people doing something similar for other parties, but they usually used a tree to hang a line for the pictures. Since our party was in a public park, I didn't really want to go around stabbing all the trees.
So, after a field trip to Lowes I came up with an idea of using wooden dowels and the hubby said he would make some blocks to screw them into.

In the end, we had to scrap the blocks and just stick the dowels into the ground (thank goodness it rained a few days earlier!), so they could be seen above the tables. Usually these kind of last minute changes stress me out and I end up unhappy with the result, but this turned out perfectly! I really liked how nice they looked without being formal. The only thing that disappointed me was not having enough space for all the pictures I had gathered. I should have bought taller dowels, so we had more space for extra line, but I think all-in-all it looked great!


I tried to keep the decorations kind of simple, especially since I wasn't sure exactly where everything would go with the party being outdoors.


I fell in love with the idea of using paper chains as a party decoration, after seeing it at a party online. And, it seemed like the perfect cost-effective, understated idea I had been trying to go for. So, after raiding my scrapbooking supply, I came up with blue and green cardstock. Then I bought a couple sheets of gold (part of the school colors) to go along with it. I ended up with three paper chains; two were a mixture of the blue and green and one was a solid gold. Once we got out there though, we realized we needed to once again improvise, so my awesome party planning partner, Liz, split them up and hung them from all the tables. It looked great!

I decided to go for a simple banner saying, 'Congrats Mercedes' to hang from the main table. I used a fun background in my Printshop program that looked like notebook paper and backed that with some blue scrapbook paper.


Since the banner was pretty simple, I decided to add some other aspects of the party into the cupcake toppers.
I made two different styles; one went on the mini cupcakes and one on the regular cupcakes.
For the minis, I used a circle stamp I got from Michaels then put a sticker in the middle.


The regular cupcake picks, I used scrapbook paper and printed, 'Class of 2011' and 'Congrats Mercedes' on them then cut them into pennant shapes.


Something pretty simple I also did was to use regular dessert napkins and stamp directly on them. I found a ($1) graduation stamp at Michaels and stamped a graduation hat into the middle of each napkin, then rolled them up with some plasticware inside. I finished them off with a piece of ribbon tied around the middle and they looked really cute (and, a lot of guests complimented me on making them look like diplomas which wasn't even my intention!). I then added some chick peas (got in bulk at my local grocery store for under a dollar) to the bottom of one of my vases, and placed the rolls inside (the chick peas allowed for extra space in the top of my hourglass shaped vase to fit more of the rolls). Super-simple, super-cute and super-cute (less than $5 since I already had the vase, napkins, ribbon and plasticware and just had to purchase the peas, stamp and inkpad)!


And my favorite aspect of the (well, most partys...lol) party...the food!
We really wanted to keep the food simple, so decided to do an open house style from 2-5, in between meal times.

In keeping with the arty theme, I wrote the food labels directly on the butcher paper that covered the tables. This was another original idea I had, and one that I was set on making happen. It looked cute and save some time and effort from having to make labels!


We opted for turkey and ham wraps wraps (did you know Trader Joes has square tortillas?? Perfect for wraps!) with various other fillings. My mom was in charge of them, and they turned out so great!


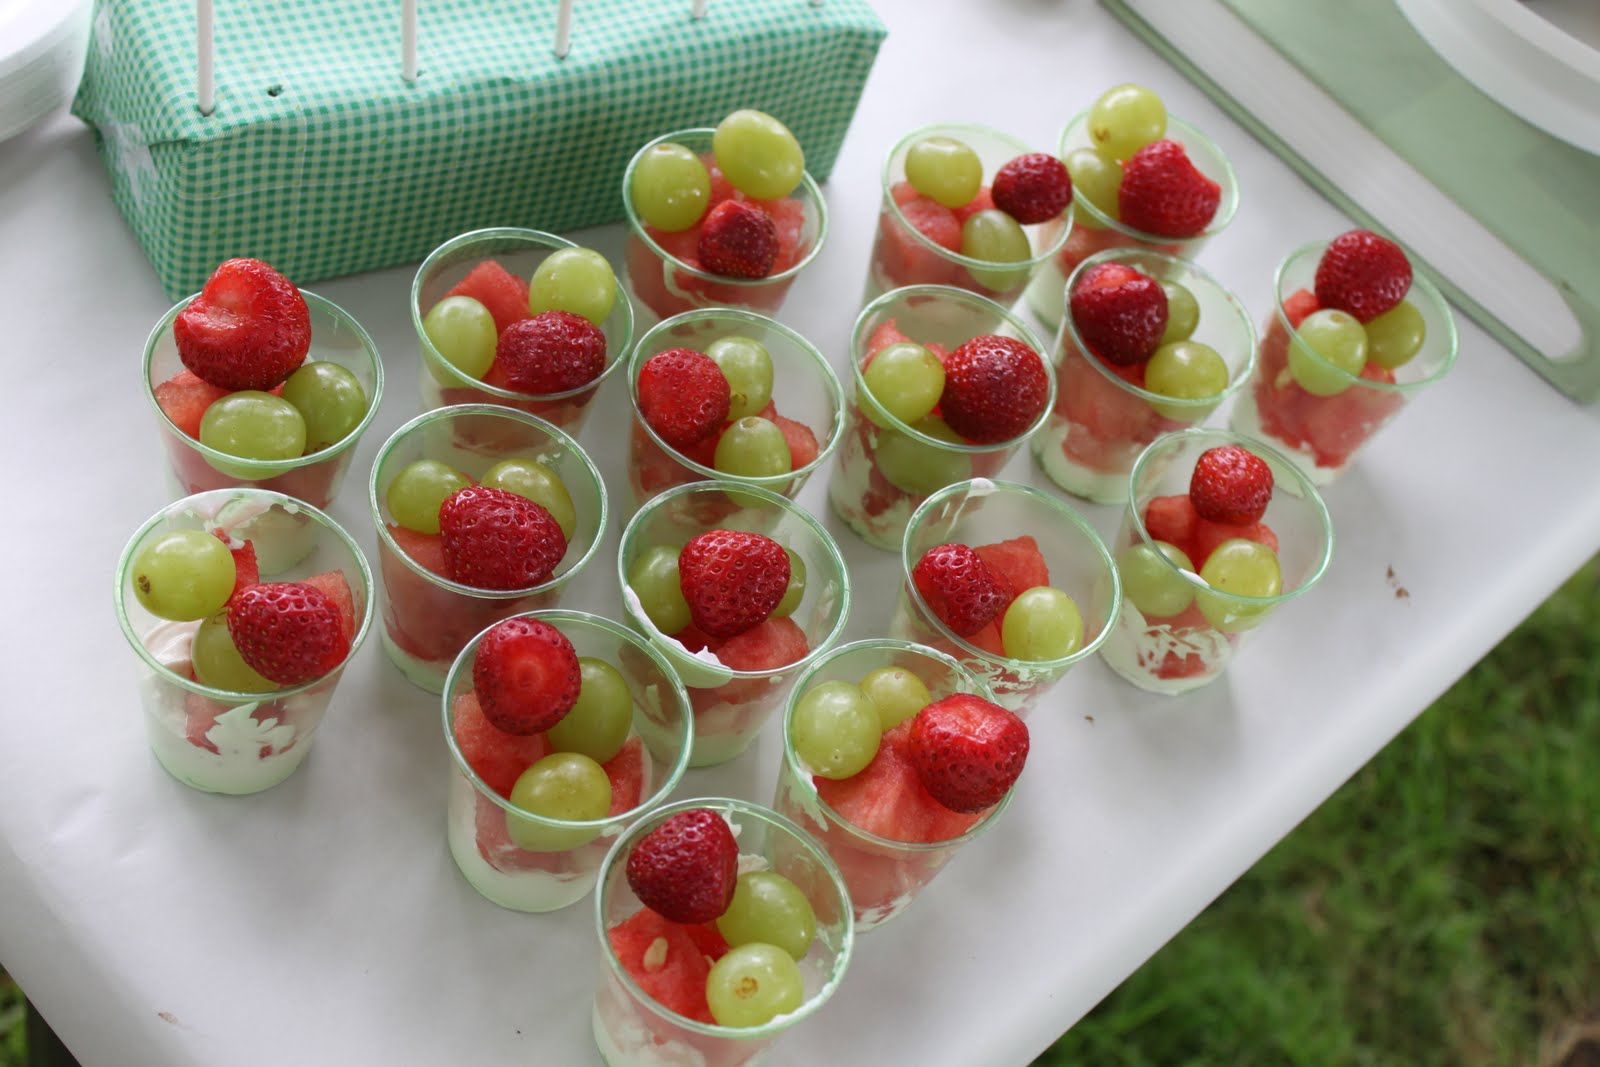
We also got different chips and dips and had some fresh fruit (strawberries were just picked by us two days earlier!) with dip (we put the fruit dip in the bottom of some mini plastic cups, then added the fruit to the top...they were very popular!).



And, the desserts were the best part...!

I got the inspiration for these fun treats from Bakerella.
These certainly requied a little extra work, but they also turned out better than I expected.  Despite the tediousness, they so were so worth it and ended up being the hit of the party!


I found another fun idea on Pinterest of using pirouhettes with a candy tie around to look like diplomas. These also proved a bit tedious, especially since I had to cut apart the color 'ropes' from the rainbow candy belts (bought at Target in the dollar spot). They also got rave reviews and were gone before I knew it!


And, of course we had the cupcakes plus a birthday cake (Costco) too.


Since the cake was really the only birthday part, I made an outline of '18' in birthday candles then made a mini pennant to go on top of the cake (using TomKat Studio's free printable!)


It was a very successful party and the party girl was happy with the outcome! I was happy that everything turned out how I wanted and I kept myself under budget!

Tuesday, July 12, 2011

Father's Day

We had a fantastic Father's Day this year! Usually I'm so busy with, well everything (June is a crazy month for us with birthdays, anniversaries and usually at least one graduation and/or wedding) that I forget about Father's Day until right before. Which, of course usually means that all my fabulous gift ideas don't get finished (or even started!) and I'm left with the standard of buying something, or giving hubby a gift card.

This year I was determined to actually get what I wanted done (despite being in the middle of planning my sister's graduation/18th birthday party). My hubby works so hard for us every day and really is the most incredible dad, ever, that he deserves the very best!

Let me just get off an a tangent here to tell you why we love him so, so much... This is the guy who doesn't hesitate to grab the (pink and flowery) diaper bag to go change a kid while we're at the store. Nobody asks him and he never complains. And, when the second kid needs to go to the bathroom three minutes later, he's off again. He comes home from a full day of work and takes the kids out for a bike ride or a walk or to the playground, and then after dinner gets down on the floor (bad back, and all) to wrestle and tickle until it's time to go upstairs for a bath, which he gives. He gets bedtime snacks, reads to one of the kids and then does it all again the next day.
He kisses owies, helps dig for worms in the garden, fixes bikes, picks flowers, goes down the slide, blows bubbles...
And, something I think is most important of all; he's also not afraid to gives kisses, hugs and snuggles. Because they have a daddy who is strong enough to know when his kids needs a kiss, anytime or anywhere, I have two of the most affectionate kids a parent could ask for.

For all those reason, and so, so many more we love him to the moon and back! And, that is why we decided he needed some extra-special Father's Day treatment!

We started the morning off by getting him one of his favorite breakfasts; the McGriddle from McDonalds. Now, I know you're saying, that's not very special...not even making the guy breakfast! But, I don't do breakfast, that's actually his area of expertise. And, he really does love the McGriddle, so it was a win-win. ;o)

After we served him breakfast, we presented him with his gifts...


I found this idea online and knew immediately I would do it for him for Father's Day (most of you know our love for all things superhero around here...in fact, Zavion's middle name is Steel, which is actually for Superman, 'Man of Steel'). What was great was that all the labels were free printables!


Zavion and I went to the grocery store and got all of Colin's favorite foods to go in the gift basket, including Dots, Sunchips, candy corn, rootbeer, of course, and lots of other favorites.


Our grocery store has a wonderful bulk foods section, and we were able to get a lot of the goodies there (saving some money!). We took everything out of the original packaging and put it in plain bags, which gave it a more authentic look.


And, let me tell you, the kiddos were so excited to put it all together for Daddy (okay, I admit, so was I!)!


The other big gift we did, my personal favorite...

I took the kiddos to the park about a week before Father's Day and had them hold the letters while I took their pics. I was a little nervous, because I knew how I wanted it to look, and things rarely go as perfectly (yes, I am a control-freak, perfectionist with a little OCD on the side...lol) as I envision, especially when the kids are directly involved. But, it went perfectly! The kids were so cooperative and well-behaved and the pics I got turned out so amazing!


We also made one for Grandpa.


And, the final gift for Dad was some questionnaires the kids filled out about him. When I saw these adorable questionnaires on Pinterest (by the way, are you on Pinterest?? If not, get on there! It's crazy-awesome. If you need an invite, please ask and I will happily oblige!) I just knew they had to be included in our Father's Day goodies. Again, I wasn't sure how well it would go with the kids answering the questions, but I told myself that any answers they gave were going down, regardless of if they were wrong or just crazy, haha.

Zavion was up first, and insisted on writing his own answers. I fully expected to have to jump in and take over at some point, but he wrote everything himself (has his mama's perfectionism!). And, he did such a great job with the answers too...so thoughtful with them that I was very proud of him!


One of my favorite answers he gave for 'Favorite sport to play...' “Tag”
I think that tells you a lot about the kind of daddy he is! :o)

Avalee was next, and I figured I might have to feed her some answers, but she was answering questions faster than I could finish! She had some truly priceless and adorable answers, and it made me really happy that I decided to start this year (I have a feeling it will be an annual thing).


And, my favorite answer of Avalee's to the question, 'My dad is special to me because:?' “He gives me kisses and sings me Avalee song."
That's right, Miss Avalee has her own special song Daddy made up just for her (and will only sing for her). How lucky can a girl get?? :o)

And, how did Colin like his gifts? He loved them (he also got a new pair of Bluetooth headphones from Mommy ;o))! He was so excited about all his superhero goodies and was ecstatic about his picture! He just kept saying that he couldn't believe how great it looked and how excited he was to show it off at work (and make the other dads jealous...he is a guy, afterall! Haha!).

And, after all that fun? Well, it was onto a late lunch/early dinner, along with my parents and his dad, who also joined us.
Colin got to pick the Father's Day menu, which was sloppy joes, salad and baked potatoes.
I made a big batch (huge, actually) of homemade sloppy joes, some Crockpot baked potatoes with all the fixings and a surprise dessert of root beer floats.


It was such a wonderful day, filled with love for our favorite guy!!


  1. Pin It

Tuesday, June 7, 2011

May Fun!

Wow, it seems like the months are just flying by around here! I could have sworn we just celebrated Christmas, but here we are in June already!

So, May was an extremely busy month for us!

We signed Zavion up for t-ball this year, so two to three days a week were dedicated to that all month. It took some adjusting, but we all got into a pretty good routine quickly (and it gave me a chance to start up our Crockpot meals again...yay!). And, how did the boy like t-ball? He enjoyed the team aspect of it, and loved being cheered for. And, of course he was very proud of himself when he hit the ball far or made a good stop. But, it was a little slow for him and he did get bored pretty quickly. He has a brain a lot like his mama's, and it doesn't ever really turn off. He's constantly thinking, planning, calculating and a lot of the game is spent just waiting...waiting to hit, waiting to run, waiting for a ball to come your way. He does seem to be en enjoying it more and more, and is improving everyday too. I'd love to see him stick with it, but of course would never push him.

Running to first...Look at his proud little face!


Coming into home plate & getting five from his coach.


Getting a fist bump from his coach after an important play.


May was also the month for the Awesome 3000; a local race sponsored by the school district. Kids in all grades come out to run against each other, and while times are recorded, everyone receives a medal for finishing. I ran in it every year I was a kid, and I think it was the beginning of my love of running when I was younger. When I saw that Z was old enough to run this year (even though he's not yet in kindergarten) I was pretty excited. I asked him about doing it, not sure the reaction I would get, and he was so excited! Then, when I went to pick up his packet, I was told a parent had to run with him. This was the day before the race. Colin was in the throes of a nasty cold and I had pulled my neck pretty badly. But, I decided to suck it up, and agreed to do the run with him. I decided we should 'practice' when we got home from getting our packet (didn't want to embarrass my boy, haha), even though we would only be running 300 meters (basically around the track). However, rain was in the forecast for the morning of the race, and Z doesn't do well in situations he can't control. So, control-freak that I am, I told him we needed to practice running in the rain, so we'd be prepared for the race the next day. And, guess what? No rain! In fact, it was pretty clear and even a little sun poked through!
And, we did pretty well, despite Z getting mowed over by a very overzealous Mommy, who seemed very intent on getting her and her kid to the front of the pack. :o/ But, my guy didn't sweat it; he just picked himself up and ran even harder to make up for lost time! And, no whining, crying or complaining from him like many of the other kiddos his age were prone too. I was just so proud of how he handled himself! And, he immediately asked when he could do it again! He might just be a runner like Mommy!

Z and Mommy getting ready for our run.


Proud boy with his medal!


We also decided to attend The Ag Fest at our local fairgrounds. Living in the state's capitol means easy access to the fairgrounds and all the fairs and things held there. We had never been to the Ag Fest before, so weren't really sure what to expect, but it seemed like a good activity for the day. And, the weather was perfect too (which is rare in May in Oregon). The kiddos got to ride horsies (Avalee was in heaven!), pet lots of adorable animals, and, of course, eat a delicious ice cream cone. They also came away with a bunch of plants they got to plant themselves for free. It was a fun day!

I know, she looks thrilled, right? She did love riding "her" horsie, despite her under-enthusiastic expression here!


Yep, in case you were wondering, Zavion is undercover here!


Miss Avalee planting away here!


And, of course Mother's Day! My awesome family let me sleep in, then showered me with gifts; a new Kindle from the hubby and candy from the kids. Wonderful! And, I was served not one, but two breakfast in bed! Zavion presented me with an apple and banana, complete with a bow and candle (leftover from Grandma's birthday a few days earlier) and Colin brought me my favorite Jack In the Box breakfast sandwich. Everyone came over and we had a nice BBQ and some yummy pie! It was a super-fun day with all my favorite people!

My little guy presented me with a lovely breakfast!


The best pic I could get of my with my kiddos, lol!


And, for one of our last adventures in May (and Spring!) we took a trip back to Ankeny Hill Wildlife Refuge (remember last year when I blogged about this place). We didn't see much wildlife, but it was the perfect day to get out and explore! The highlight of our hike was stumbling across a little waterfall tucked way back behind some out of the way trails, and seeing a flyover of two fighter jets on the way out (it was Memorial Day).

One of our 'wildlife' spottings; giant slug! ;o)


The kids checking out a wildflower. Love the curiosity on their little faces!


They decided to just plop down in this field for snacks...and conversation. Love these two! :o)


Such a fun, and busy month and I look forward to Summer and more fun times ahead!

Saturday, May 28, 2011

Mommy Playdates

I belong to an awesome mom's group that allows for frequent get-together of kiddos to play, craft, run around, etc. My kids really appreciate having other kids their age to play with, and I appreciate a break from hearing “I'm boooored!” and “But, I don't want to play with my sister/brother anymore!”

But, what I also love about my mom's group, are the mom's night out (MNO). We usually get together at least once a month for bingo, bunco and even the occasional fondue night or movie night. I can restore my sanity, if only for a few hours, and be free to eat with both hands. I'd love to say the conversation is more grownup too, but we often fall into the routine of talking about our kids' most of the night anyway. Oh well, just being able to get out more then two words of a sentence before being interrupted to untangle the fork from your daughter's hair, get the shoe out of the toilet or remove the banana peel from the dryer is pretty much heaven.

One of my favorite aspects of our MNO, is the food. Some of the moms really go all out and bring some truly nummy (yea, I said nummy...see I do need to get out more) dishes!

I myself decided I wanted to do something different then the usual cookies or rice krispy treats (though don't get me wrong; I could very well live on chocolate chip cookies and rice krispy treats alone), so came up with a couple fun foods...

This first one is something I've been wanting to do for awhile; brownie balls. My little guy and I fell in love with these after trying them from our local bakery. We'd make up any excuse we could to have occasion to go get them, Unfortunately, the bakery recently went out of business and took our beloved brownie balls with them. After sulking and pouting for a couple weeks, I decided they seemed like something we could make ourselves. As with most new recipes I want to try, I headed for the internet. I found a few recipes for 'brownie balls' but they were mostly disappointing to me. Most recipes called for adding frosting to the cooked brownies. While that's a standard practice for cake balls, it just seemed to me that brownies are already rich enough. So, I decided to just do it myself.

Brownie Balls

Ingredients:
Brownie mix (you can go with homemade brownies here, but the boxed Hershey's never let me down)
Six squares Bakers Chocolate, semi-sweet (these are pretty rich, so if you use another chocolate, still stick with semi-sweet)

Optional:
Sprinkles, cookie crumbs, nonpareils
Sucker sticks

Directions:

Mix brownies according to directions, but cook about five minutes less then recommended time (make sure they are done, but still soft)
Cool completely
Turn out brownies onto surface, and trim edges off (use pizza cutter to speed this up and please, save those scraps...perfect for hot fudge sundaes)


Begin scooping brownies, shaping into about two inch balls (use a cookie scoop for the perfect size) and set on parchment (or Silpat) lined baking tray.
Put finished balls into freezer (if you want pops, insert lollipop sticks now) for about 10 minutes
*And, if you are worried about this task becoming monotonous, make sure you have a five year old who is very eager to discuss with you all aspects of Dinosaur Train.


Taking out a few at a time, dip balls into melted chocolate and put on another baking sheet. If desired, add sprinkles, cookie crumbs etc.
Place back into freezer for 10 more minutes until chocolate has set.


And, that's it! Simple, yummy, and fun enough to take to your next outing!


This next one is just something that seemed fun, and actually, it was one of those situations where I didn't want to drag my crew to the store, so used what I had on hand: marshmallows and chocolate. And, you know you can never go wrong with that combination!

Chocolate Covered Marshmallows


Ingredients:

Marshmallows (I used two different flavors; vanilla and chocolate)
Chocolate (again, I used both milk and white chocolate & added some peppermint extract to some of the white to make it mint flavored)-melted
Pretzel sticks
Sprinkles, cookie crumbs, etc (optional)

Directions:
Melt your chocolate in batches in the microwave (and, yes, you can melt white chocolate in the microwave; just go a minute at a time and be prepared to keep re-heating as it hardens)
Insert pretzel stick into marshmallow and dip into chocolate, making sure to add some melted chocolate to the hole around pretzel stick
Sprinkle with cookie crumbs, sprinkles, etc
Refrigerate or freeze until hard


Simple, inexpensive and fast enough to throw together last minute!


Hopefully, there will be many more mommy playdates in the future, so I can create more fun food! :)

Wednesday, May 11, 2011

Day-Cation:Wildlife Safari

We are a family that likes to do, go, experience. We don't buy a lot of fancy things (not that the kids aren't spoiled...thanks Grandparents!), have only one car (hubby commutes to work by bicycle) and try to eat-in as much as possible. We save our money for little trips here and there. Living in the Great Northwest means ample places to visit, many of which can be done in one day. As a family of four, this suits us just fine.

One of our absolute favorite places to visit, is Wildlife Safari in Winston, OR. It's about an hour and a half to two hours (depending on potty breaks, traffic, etc) so pretty reasonable for a five and two year old. This was our second year in a row visiting this magnificent place, so we were all pretty excited!

As weekends there can be pretty crazy, we decided to go on a Monday (Colin had just returned from a four day trip to St Louis for work too, so this was just the family time we all needed). We happened to pick the perfect day too! The sun was shining the whole time we were there and it only rained just as we were leaving.

We started our first drive-thru (you get to go through twice) and almost immediately, Avalee started “oohing” and “aahing” and practically jumping out of her seat! Apparently, she saw a giraffe just ahead and then an elephant. She was about as excited as I've ever seen her! We eventually let both kiddos out of their car seats (you drive through at about 5mph, tops) so they could get the best views.

Grandma was in the backseat with them, and unfortunately I think she got quite a few flying elbows, knees and blocked views from a couple very excited kids...hahaha!

Zavion even brought along his constant companion and best friend, Leopard (his stuffed cheetah), who got to sit on then window for some pretty cool views of bears, lions and bison.

After we drove through, we stopped for lunch at the restaurant there and were treated to a fun show by the monkeys outside. We had a perfect view of their crazy antics, including climbing to the tip-top of a tall (telephone-like) pole and screeching very loudly. The kids loved it, and had to be reminded several times to finish their lunch so we could go see them in person.

After lunch, we headed straight for the monkeys who were still screeching and now swinging wildly from tree to tree. Avalee, however, couldn't care less about the monkeys; she was enthralled with the giant Koo fish that were in the moat around the monkey area. She would pint out fish after fish and squeal with delight when they started swimming around! After visiting with some flamingos, cheetahs and taking a little break on the playground, we were ready for a second drive through.

This time we were treated to feeding-time with the bears and even got stalled when some mountain goats decided to get into a tussle a few cars ahead of us, locking horns and pushing each other around for almost 15 minutes! We also got to see some baby cheetahs (and their very nervous mama, who was pacing back and forth behind them) and the lions giving each other a bath.

It was a fun, fun day and one that I know my whole family enjoyed! This was just one of our many day-cations I'm sure we'll go on this year, but this was definitely a great start!


The kiddos checking out the animals from the best view in the house.


During the walk-through; the kids check out the (very smelly!) flamingos


This little guy tried stealing Avalee's hotdog!


My little guy discovering the moonroof as a great vantage point

Sunday, May 8, 2011

Back to blogging...after these messages

Wow, has it really been that long since I last blogged?? Nothing in April? Shame on me!

Well, it's not that I don't things to say, pictures to share news to report...I just haven't had the time to sit down and write anything up!

Between my grandma going into the hospital for open heart surgery the beginning of April to Zavion starting t-ball to all the holidays and birthdays; I'm all tapped out!

So, having said that, I do have some fabulous new posts to share with all of you soon, and I promise to have something new this week. Really.

In the meantime, I'll leave you with this ridiculously adorable photo of my ridiculously adorable children.
Posted by Picasa

Saturday, March 19, 2011

Happy Pi Day!


Did you know there was a celebration of Pi??

For those who don't know Pi is is a mathematical constant approximately equal to 3.14159265.


So, March 14th (314) is the official Pi Day holiday.

And, of course, as with any holiday, it deserves celebration...don't you think??

Oh, by the way, hubby is a huge computer/math/science geek, and is slowly turning the five year old into another science geek (on the list for birthday #6; a mad scientist party). So, celebrating Pi Day makes sense for us. ;o)


Plus, it's a nice excuse to make (and therefor consume) fun, yummy stuff.

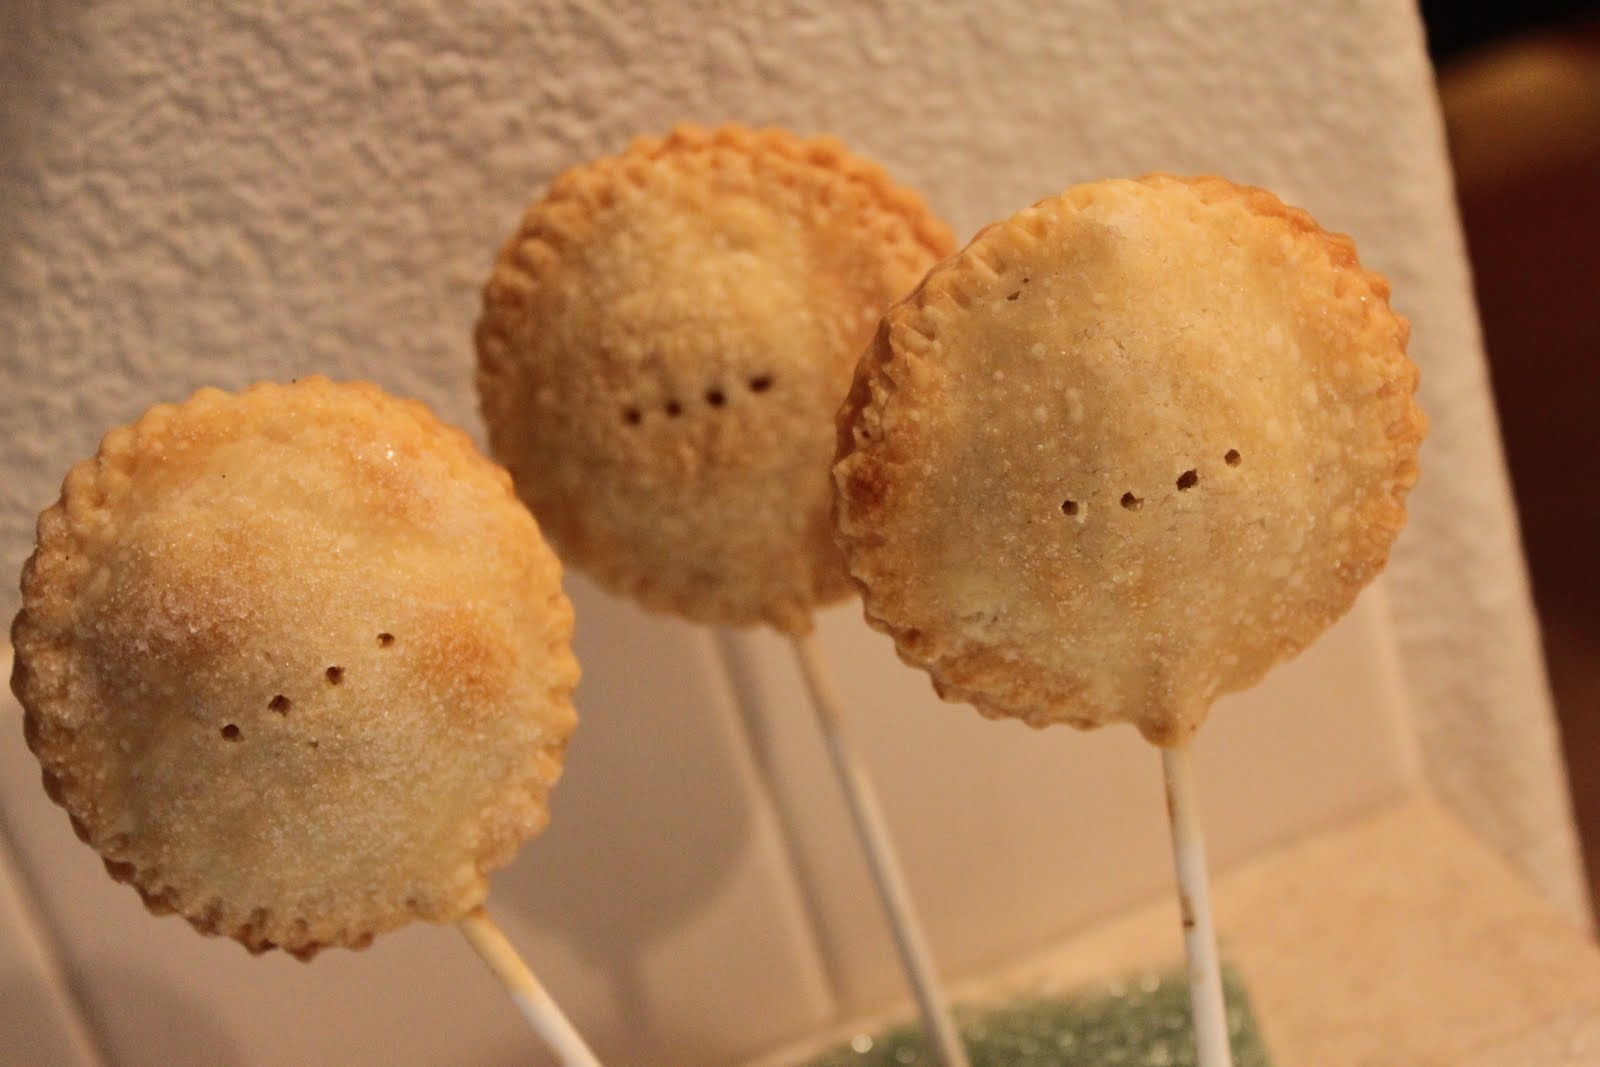
Like these Pie Pops.

I've seen these floating around the internet for years, and have been wanting to make them for sometime. I always thought I'd make them for Thanksgiving, but then they always get moved to the bottom of the list, after all the regular foods getting planned out.

These are really easy to make, super-duper cute and yummmmy!

The world's cutest two year old showing off how good these are to eat!


Ingredients:

Pastry dough (I just use the refrigerated stuff)
Pie Filling
Melted butter
Sanding sugar
6” Lollipop sticks
Cookie cutter
Water

Apple Pie Filling: (combine all ingredients below):

1 medium tart green apple, peeled and grated
1/4 tsp ground cinnamon
1 tablespoon packed brown sugar
1 tablespoon flour
1/2 tablespoon lemon juice
1 tablespoon cold butter, grated


Preheat oven to 375 degrees. Line a baking sheet with parchment or a silicone baking mat if desired.


Directions:

Cut out your shapes of choice (try to keep it 2” or under; too big and they'll slide off your stick, too small and you won't be able to put much filling in)-I used circles so they looked like little pies.

Spoon about 1-2 tsp filling to middle of shape (leave about 1/4” around edge to prevent seepage)

Add lollipop stick to middle of shape, place near top of 'pie.'

Dip your finger in water and run around edge of shape. Do the same for another shape, then place on top. Gently press around edges to seal.

Using a fork, crimp around edges, making sure to seal around lollipop stick.

Brush with butter and sprinkle with sanding sugar.

Bake pies for 15-20 minutes until barely golden brown. Cool for a few minutes and then transfer to a cooling rack.

We sprayed on some whipped cream too, and these were soo yummy!


We also had pizza pie-BBQ chicken.


Here is a super-yummy and easy recipe for BBQ chicken using your slow cooker!

Ingredients:
6 frozen skinless, boneless chicken breast halves
¾ to 1 full (12 ounce) bottle barbecue sauce
1/2 cup Italian salad dressing
1/4 cup brown sugar
2 tablespoons Worcestershire sauce
¼ red onion, sliced
¼ C cilantro, torn into pieces

Directions:
Place chicken in a slow cooker. In a bowl, mix the barbecue sauce, Italian salad dressing, brown sugar, and Worcestershire sauce. Pour over the chicken.
Add sliced onions and cilantro to top.
Cover, and cook 3 to 4 hours on High or 6 to 7 hours on Low.
Pull out chicken breasts, shred and return to slow cooker.
Continue cooking for another hour.

After it's cooked, you have so many options!

We like to make BBQ Chicken sandwiches with some ciabiatta bread and a smokey cheddar.

Or, we make BBQ Chicken quesadillas with lots of colby jack cheese.

But for Pi Day, we had to make a BBQ Chicken pizza pie.

So, this is my 'recipe' for the pizza. Ready? It's really hard. Here we go...

Ingredients:
Pizza dough (our local grocery store sells pizza dough for cheap-o, but you can make your own, of course)
BBQ Sauce (if you only used ¾ bottle of sauce for your chicken, the rest will be the perfect amount)
BBQ Chicken
Colby Jack cheese
Cilantro (optional)
Spread a think layer of sauce to crust than layer the rest of your ingredients.

Cook.
Eat.
Yum!
Related Posts with Thumbnails

Guestbook

 
Pin It button on image hover